Smarthome
This was the hobby project that let me control radio-controlled switches with a custom app. Take a trip back to see what I eventually learned for today’s version.
Hi, 2021
This is the case study I wrote in early 2021 for the first version of Smarthome.
By this point, the project was over five years old. I was using the app daily for my lights and switches, long enough to start catching those once-a-year bugs that would pop up after running a web app for weeks. Today’s version grew out of this experiment of giving still-good tech something to do, and I owe it to my past self for those nights where the iPhone would freeze or a ghost would randomly turn on every light.
Motivation
I love living in cities, which means I’ve been an apartment dweller for several years. Questionable décor decisions have always added to the fun of it, but the awful overhead lights they’d come with was always a step too far. We’re talking fixtures like those finial-adorned domes, ceiling fan floodlights, the fanciest, tiniest chandeliers ever. The look of these lights wasn’t great, and neither was the overpowering, flickering, steely-blue light they’d give off.
The easy solution was to rely on lamps and counter lights to brighten up my place, skipping the ceiling lights altogether. The biggest downside of separate lights, though, was having a distinct, fiddly control for each one (if I could even reach it). In my well-shaded apartments, I found myself trying to find the clickers or the switches or the doodads for the lights all day.
To get customized lighting without the fiddling, I decided to look into some sort of centralized, smart-ish home solution. And instead of reaching for something off the shelf, I began by researching DIY projects to see if I could build something totally custom.
Process
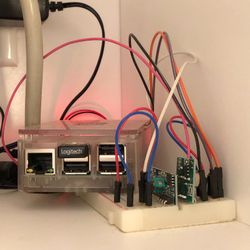
My quest for a DIY smart outlet system started with a guide that explained how to link up a particular brand of remote-controlled outlets with some other parts to make an extensible system. With a Raspberry Pi, a transmitter chip, and an open-source program to control the outlets from a command line, I’d be able to turn on my lights over the internet. I got going by assembling my very first breadboard, connecting the chip to it, and confirming that everything worked.
The guide then described how to set up a web server to host webpage on the Pi, which would serve as the UI to replicate the physical remote control. That was enough to start controlling the lights from an app, starting small with “on” and “off” in separate-controlled buttons. I wanted to push the interface a lot farther than something that looked identical to the physical plastic remote, though.
Giving the outlets a brain
First, I added the ability to track the state of each light — like if it was on, if it was part of a group, and the room that it was in. That gave me the ability on the frontend to incorporate toggles instead of separate buttons blasting out commands.
After getting the first on/off text buttons set up, I gradually added logic like:
- Turning on all lights in a particular room
- Setting and swapping out predefined scenes, like “waking up” or “evening”
- Controlling separate outlets together, like a pair of lamps behaving as one
- Turning off everything (and making it work reliably!)
Balancing functionality with aesthetics
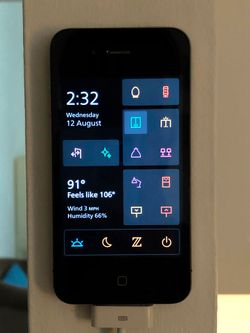
From the start of the project, I planned to use a dedicated device to display the switches and status so that turning on an outlet would be just as easy as flipping a light switch. Since this thing (specifically, a trusty ol’ iPhone 4) would be permanently affixed to the wall, I wanted it to have a purposeful, well-designed appearance that presented all these controls and statuses in a clear way.
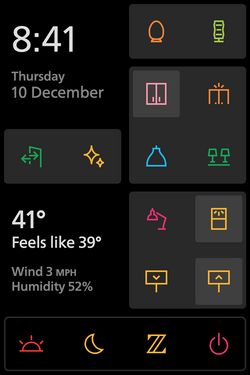
Taking some design cues from other products, like an Apple Watch or Google Nest, I opted for a dark interface so that the web app merged seamlessly into the iPhone’s black display bezel. For the UI itself, I created an abstracted layout of my apartment and positioned the buttons corresponding to an outlet’s physical location. To indicate status, each button switch got an icon, becoming highlighted when that light turned on. Finally, I put scene buttons and the “everything off” button at the bottom of the screen.
Iterate, iterate, and iterate some more
As time went on, I iteratively added more features to make this system feel less generic and more like a custom project. I added things like:
- Color themes like a subtle rainbow theme for Pride
- Current weather, to take advantage of some free space and make the phone on the wall even more useful
- An extremely exciting time and date
I also made the always-on-the-wall iPhone behave even more like a home appliance by enhancing it with some custom functionality. Doing so allowed me to precisely adjust the iPhone’s brightness based on ambient light, disable the lock screen and rubber banding effects, and schedule a period overnight to put the phone to sleep.
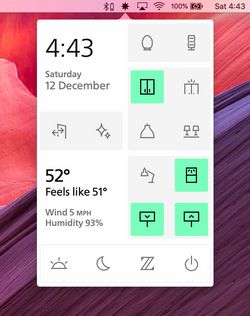
More recently, I added a couple more old iPhones to the mix — they’re inexpensive on eBay these days — and a menubar app on my Mac, keeping my system scaling and adapting just for me.
Evaluation
(What worked well and what I’d do differently)
- Smarthome has been reliable and useful. I’m pretty pleased, especially considering the project is cobbled together with low-cost outlets, my best attempt at circuitry, and some old iPhones.
- The app doesn’t run on a frontend framework yet. I have some ideas for granular light controls, dimmers, and other interface techniques. A framework will let me abstract away state management for the UI and focus on the fun stuff.
- Adding color themes helped to make Smarthome feel like mine. Earlier versions were strictly monochromatic, which was sleek… but maybe to the point where it felt sterile.
Details
Timeframe
Original iteration introduced July 2015. This redesigned iteration introduced December 2017. Features added June 2019.
Skills in use
Frontend programming, UI design, hardware/software interaction design, graphic design and layout, device management
Tech specs
- System that interfaces with radio-frequency (RF) controlled outlets via an open-source program (rfoutlet), an interface to send signals from a transmitter chip
- Raspberry Pi web server bridge between app and transmitter, including a custom system status mechanism using PHP
- Lightweight web app built with HTML, CSS, and JavaScript
- Two iPhone 4 devices with extra capabilities for finer power management and appearance control
- Simple menubar app for macOS


